


UNFO BRACE for Metatarsus Adductus (MTA)
Treatment Guidelines for Professionals
Introduction
The UNFO box contains an additional strap, a user manual, and the UNFO BRACE.
The use of UNFO BRACE is upon the doctor’s recommendation only.
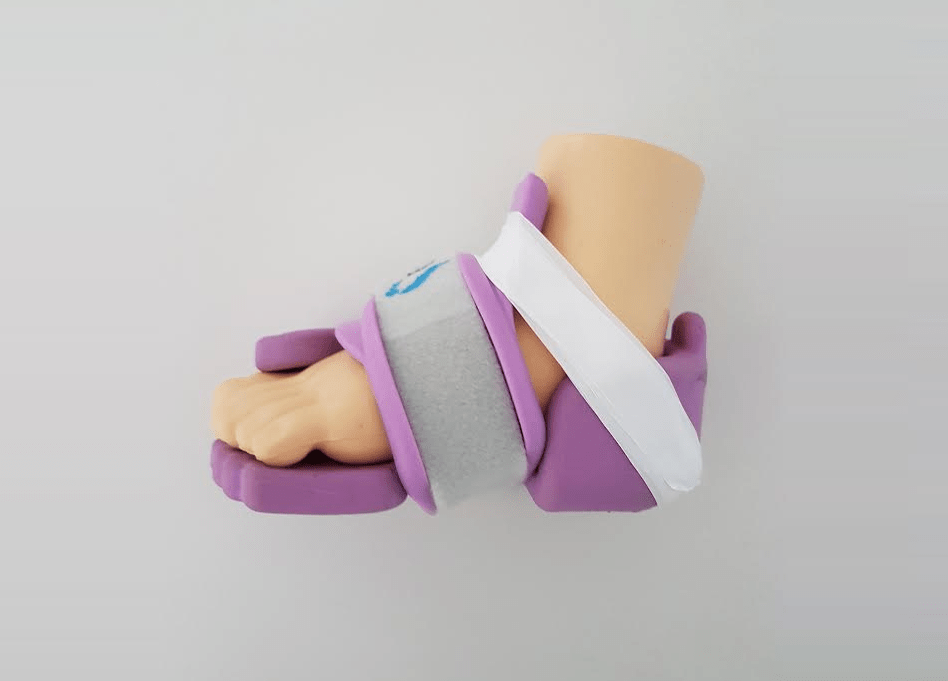
The UNFO BRACE consists of three parts: The brace’s body, the cushion, and the strap.
Before setup, explain to the parents that the therapy is not painful for the baby and that the average therapy duration is between six to eight weeks of 24-hour therapy, and then, an additional six to eight weeks of overnight-only therapy.
The therapist is the only person to determine therapy duration, according to the severity of the case and the progress made during the therapy.
MTA Severity Checks
3 types of parameters are considered to determine the severity of the case:
1. The heels bisector classification – which is performed using a ruler according to Bleck’s method. Put the ruler in the middle of the heel and check the heel bisector line.
The ruler should properly point towards the second toe. If it points towards the third toe then the severity is low, towards the fourth toe – moderate severity, towards the fifth toe – high severity.
2. The flexibility of the baby’s foot
Hold the foot (at the heel) and try to move its upper part. If you manage to move the joint outwardly, beyond a straight foot position for “over-repair”, then the foot has high flexibility, which indicates low severity.
If you didn’t achieve over-repair but only “neutral” then the severity is moderate, and if you couldn’t even achieve a neutral position, then the severity is high.
3. The medial crease
If there’s a medial crease, this is a parameter that indicates a situation where the foot won’t go normal without medical intervention.
Before Installing UNFO
Before starting the therapy, it is recommended to take a picture of the foot, to monitor the therapy progress.
You can make adjustments to the UNFO BRACE if needed, depending on the foot shape.
The first adjustment would be the enlargement of the heel cage area.
The backside of the inner part of the UNFO BRACE is bisected to release pressure from the ankle area, in case the baby’s foot is wide or large in the back.
The enlargement is performed by making a hole in the designated area and making a cut all along to the bottom of the heel.
Another possible adjustment would be releasing pressure from the toe.
If the baby’s toe is inclined upwards, the pressure on it must be released, by making two holes in the soft area which is on top of the rigid area in the toe fastener and making a cut to connect the holes.
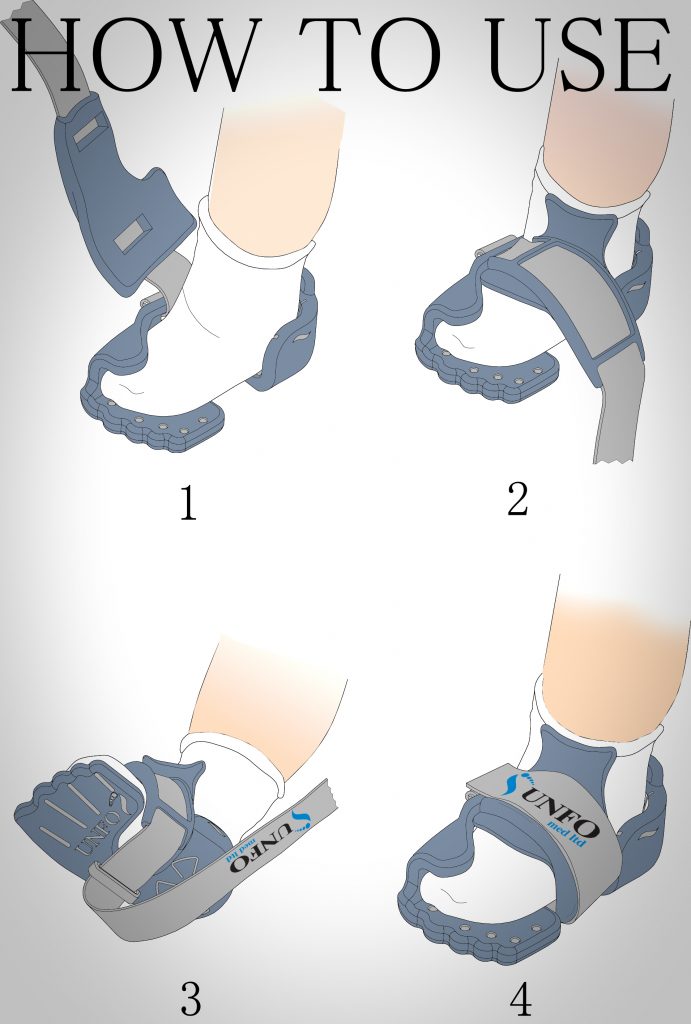
Installing UNFO Brace
Before the UNFO BRACE is installed on the baby’s foot, a sock must be worn. It’s very important for the sock to be 100% cotton, tight and folds-free. Folds might cause redness around their area.
It’s essential to treat this deformity in the following steps written below.
Please follow carefully the following steps:
1. Before the setup, place the cushion as close as possible to the brace’s body. After bringing the cushion and the brace’s body together, hold the foot and place the heel in its position directly. Hold up the toe fastener and insert the rest of the foot.
2. Make sure that the heel and the end of the brace have a tight contact, and that the whole foot tightly touches the bottom of the brace.
3. After inserting the foot into the brace, adjust the cushion so it’s in the center of the foot, aligned with the middle of the shin.
4. Embrace the foot and the cushion together tightly and avoid any void between the foot and the cushion, thread the strap and stretch it over the foot and the brace’s body. Don’t over-tighten the strap forcibly.
Tightening the strap properly will ensure that the brace is fixed and won’t move away.
5. After finishing the setup, remove the brace from the baby’s foot and ask the parents to try and perform the setup by themselves, until they perform it correctly.
Explain to the parents how to conduct the situation during the following weeks:
During the first day, the brace must be removed every two hours for 10 minutes. The brace must be re installed again when the 10 minutes are over. During the first night, there is no need to remove the brace, unless the baby cries and no other reason for his crying was found. In that case, the brace must be removed for the first night only, and then set up again in the morning.
During the second day, the brace must be removed every two hours for ten minutes, until the evening bath. After the bath, the first-two-weeks protocol is initiated.
During the first two weeks, the brace must be set up 24 hours a day. The brace must be removed only twice a day: In the morning, to change the baby’s clothes and socks, and in the evening, to give the baby a bath and to change their clothes.
Two weeks after the first Installation, the patient should visit the therapist, to run the first checkup.
Possible Side Effects
Explain to the parents about three possible side effects of the therapy and how to deal with them:
Slight foot redness is very common and regular which requires no special treatment.
If the redness is strong, it is recommended to put two pieces of medical paper Band-Aid on the red area and continue with the therapy regularly.
If bedsores or blisters appear on the baby’s foot, a problem that occurs mostly due to over-tightening of the strap or improper setup, then therapy must be stopped for about two hours.
Anti-irritation cream for the skin should be applied on the area, and then the area should be covered with a Band-Aid. After two hours, therapy should be continued regularly. If things get worse, consult your therapist.
If the baby removes the brace from their foot, check if it was set up according to the instructions. If so, we recommend wrapping the brace 3 times, from the heel to the cushion, using a medical paper Band-Aid.
Therapist Monitoring Visits Guidelines
Usually, depending on the severity of the case and the instructions of the therapist, the brace must be worn 24 hours a day for about 6 to 8 weeks, and then 15 hours a day for 3-4 weeks, followed by 12 hours a day for an additional 3-4 weeks.
It is recommended to get a first checkup two weeks after the first setup, to monitor the progress of the therapy and the repairment that has been obtained. If the progress is satisfying, instruct to continue a 24-hour therapy for additional 4 weeks.
A second checkup should be performed after six weeks of a 24-hour therapy. Depending on the therapy progress, decide whether the patient can switch to a 15-hour over-night therapy, or continue with the 24-hour therapy for a certain period of time.
A third checkup should be performed after three weeks of a 15-hour over-night therapy. Depending on the therapy progress, decide whether the patient can switch to a 12-hour over-night therapy, or continue with the 15-hour over-night therapy for a certain period of time.
If you observe a regression in the therapy progress, you may also decide to return to a 24-hour therapy for an additional 2-4 weeks.
A fourth checkup should be performed after three weeks of a 12-hour over-night therapy. Depending on the therapy progress, decide whether the patient is done with therapy or should it be continued.


